Finnish Lapphund Grooming
Grooming Made Easy
by: Jackie Barbor
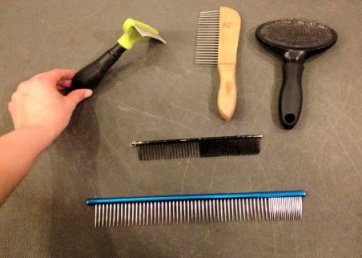
That beautiful double coat is one of the many reasons we fell in love with the Finnish Lapphund, but maintaining your lappy’s luscious locks shouldn’t feel like a hassle. Grooming time shouldn’t be a dreaded experience for you or your dog. While their coat texture is more “harsh” and does not mat easily, we all know that doesn’t mean you can skip out on regular grooming. That thick coat needs to be brushed out properly in order to maintain a healthy undercoat and also helps keep your home from collecting dead hair. With the proper tools; (a slicker brush, greyhound comb, wooden handle comb, undercoat rake and a stripping knife), and products, coat maintenance is a much easier and less time consuming task. As a dog groomer, I have the opportunity to share my grooming experience with my clients and now to you!
It is very important to start grooming your lappy from puppyhood. They will need to be groomed their whole lives and the best way to prepare them for that is to start young. This should be a pleasurable experience, but not playtime! Remember, the floor is your puppy’s playground. It’s best to put them up onto a counter or table to get them out of their element. Most of the grooming while they are puppies is about getting them used to the brush, their nails being trimmed, the bath and the blow dryer. Patience is very important with all aspects of training a puppy and grooming is no exception.
They may try to bite the brush for example, and you mustn’t get angry with them. A puppy will also most likely be afraid of a blow dryer the first few times; start on a low setting and don’t rush it. You can’t expect them to be perfect and you always need to work in baby steps. With a little bit of encouragement and with each grooming, your pup will become a pro!
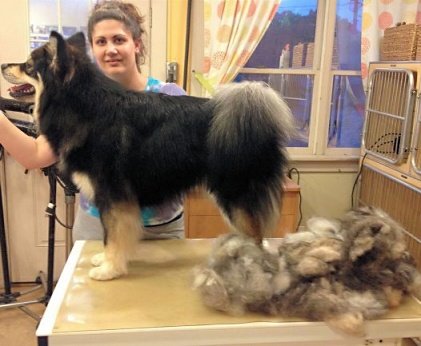
The first thing that I like to do when grooming my dogs is use the high velocity dryer to go over their coat. The dryer helps break apart any dead hair that is building up and also gives you a clear view of your dog’s skin. This is helpful in checking to see if they need a medicated shampoo or something with moisturizers in it. Once you go over the dog, then you will start with your tools. I start with my wooden comb or undercoat rake, (I only use the undercoat rake if my dogs have a lot of dead hair built up), at either side of the dog’s rear. Lifting the coat up, starting down by the hock, comb down. Continue in this pattern around the entire dog. Lifting the front legs up and forward makes combing out under the arms and the belly much easier. If it has been a while since your dog’s last grooming or it’s that time of year when they are shedding, an undercoat rake is most helpful. I’ve found that if you keep up with the brushing, about every 1-2weeks, you don’t need to use the undercoat rake.
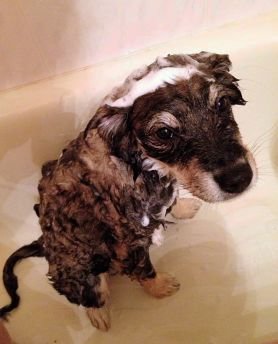
After your dog is entirely brushed out, it’s bath time! I recommend using Isle of Dogs No. 20 Royal Jelly Shampoo, (helps to reduce shedding and also adds volume to the coat), and their ‘2 build’ conditioner, (a volumizer). Any product that adds volume without softening the coat will work well. I use EarthBath puppy shampoo, a tearless, soap-free product, for their faces. With that thick double coat, it is very important to wet the entire coat down to the roots. I like to wash the body first because once their head gets wet, they’ll start shaking, and then it will look like you’ve been having the bath! I also like to massage the shampoo and conditioner into my dogs’ coat; it helps to thoroughly coat the hairs and I think it makes for a more relaxing experience as well. Who doesn’t love a good massage? When rinsing, make sure you don’t leave any soap in your pup’s fur and don’t forget to clean those ears with a cotton ball and some ear cleaner.
You shouldn’t need to wash your dog that often, unless they love getting dirty or you are showing your dog. Finnish Lapphunds lack that “doggie odor” and generally stay clean for a long while. I only wash my dog, (who I do not show), about once a month and that is only because he gets a moisturizing treatment for dry skin. After a good towel dry, start the high velocity dryer and while drying, use the slicker brush to help with drying and to fluff out their coat. They should have a smooth top line, hindquarters and rear feathering. The feathering on their front legs should be brushed straight and slightly out towards their rear. Their tail and the scruff around their neck should be fuller; I dry up in these areas.

Try to make sure your dog is bone dry; this is especially important if showing your dog. It makes going over them with a greyhound comb much easier; this is one of the last steps. After your dog is dry, go over your work with a greyhound comb starting from one end of the dog to the other. Once again, lift the hair up and comb down. There should not be anymore dead undercoat left once you are through.
The final touches are on their feet. Trimming the hair between their pads, (either with a clipper or scissors), I feel is more sanitary and makes it easier for them to walk on wood/tile floors; less dirt gets brought into the house and they aren’t sliding on the floor. Make sure that their nails are clipped and the last thing that I do is tidy up around the sides and tops of their feet so that the hair is not splayed out. This is more of a personal preference.
One additional thing I like to do in removing dead hair from my dogs is to use a stripping knife. ONLY use this tool on your dog’s muzzle and on the front of their legs. If you use it on their body, it will break and damage their hair.
There isn’t much of a difference in the way I groom my Lappies for conformation vs. regular pet maintenance. I am just much more meticulous when grooming my show boy. I also like to add a little of Survivor from Eqyss Grooming Products on his coat for added shine.
Grooming a Finnish Lapphund does not have to be a tedious task and I hope that by using these techniques, you’ll be able to maintain a luxurious fur coat which makes for a happy lappy!
Grooming Feet
by: Andrea Johnson
Following a discussion on the member list about how to prepare your Finnish Lapphund for showing, I put together the following information on how to properly groom Lappy feet. Next to a bath, tidy feet are the majority of grooming of a Lappy.
Grooming Tools

Palm Pin – A slicker brush will also work well but I prefer a palm pin - the pins are larger and I am forever sticking myself with the slicker brush tines.
Scissors – You do not need to buy expensive scissors. Pet and beauty supply stores sell good scissors. Remember that hair (especially if it’s dirty) dulls scissors, so you will need to periodically re-sharpen or replace them.
Undercoat rake – This lifts out the undercoat when the dog is shedding faster then any other type of brush or comb will!
Toe nail clippers – I only use these to trim the bulk of the nail away when I'm a bad Mom and let my kids' nails get too long. In my opinion the scissor kind (shown), pinch the quick (which is sensitive!) much less then the guillotine kind. Either type in a novice's hand can result in quicking (bleeding) if not EXTREMELY careful. I prefer a dremel.
Cordless dremel – The corded dremels are just too fast. They can get too hot and hurt your dogs. They also move so fast that you can quick your dog MUCH faster then you would think. (Editor’s Note: Use the three second rule. Never apply any dremel to a nail for more than three seconds. Friction is what causes heat. Test the nail temperature with a finger before continuing.)
Baking flour – If you quick your dog, apply a pinch of the flour to the tip of the nail and hold with firm pressure to help stop the bleeding. You can purchase a powder called “Quick Stop” that is made just for this situation, but flour does the trick!
To Table or Not to Table

I was going to leave my victim in these pictures anonymous as I didn’t want to claim the state of neglect her feet were in, but for the sake of instruction I opted to include these pictures which pretty much let the cat out of the bag. This shows how I hold the dog in my lap for optimal control. You’ll note that the opposite end from what I am working is restrained by my leg. This allows for me to “feel” when the dog is building/tensing with the notion of leaving my lap and gives me the upper hand in correction before the wrong behavior is executed. Kind of tells me what they are thinking.
Many people use a grooming table. Tables are wonderful as they lift the dog to a much friendlier level for your back. Many dogs can be trained to behave on the table, but some just can’t get over it. NO DOG SHOULD BE LEFT UNATTENDED WHILE ON A GROOMING TABLE, even those that have been trained on them for years. Not for a second. The time it takes to pop them down and pop them back up is nothing compared to the trauma that can result from a slip off the table. My Mother’s 13 year old Standard Schnauzer, multiple best of breed - show dog, groomed all her life every month or more, steady to hours of grooming dictated by her breed standard, slipped/jumped/fell off the table while being groomed. She did such damage to her spine that the only thing that could be done to stop her pain was to euthanize her. If you choose to use a table, please practice safe grooming!
Furry Feet


Photos 3 and 4 show the state of a Lappy foot gone a stray.
Photo 5 shows an example of a dirty foot. This dirt will kill your scissors and make it MUCH more difficult to get a proper trim. The dirt clumps the hairs and without fail you’ll think you’re done, and out will pop several wayward hairs to the surface. Endlessly frustrating, hard on your scissors, and you will never get a perfect trim like that! Always start with clean feet!

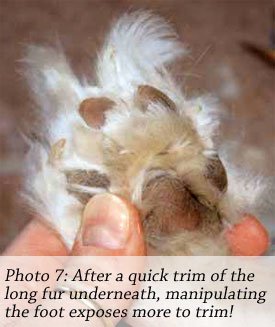

Photo 6 shows how to trim the fur flush with the pad. Photo 7 and 8 try to demonstrate how to use your fingers to move the toes forward and back to reveal more hairs that can be trimmed. You’ll be surprised how much more you can trim if you manipulate the digits. The result is a more professional trim that lasts longer between trimmings. You do not need to get as involved with getting ALL the fur in between the pads as some breed standard require. Poking scissors in there and cutting blindly is not advised. A simple cut, flush with the pad is perfect. It is also good at this time to trim the toenail of any dewclaws your Lappy may have. If you are unsure your Lappy has dews, feel the paw itself. There will be a lump about were your thumb would be on your own hand. Part the fur, as the fur often makes dews next to invisible, and be sure to keep this nail short. Dews don’t wear on any surface, so they grow without impediment and can get quite long very fast. Neglected dews can grow right back into the toe they came from, resulting in infection, pain, and lameness.
Shaping the Foot
Photo 9 shows how to use the palm-pin or slicker brush to pull back the fur on the top of the foot. Photo 10 shows the bulk removal of this fur, followed by Photo 11 which shows how to use your finger to swipe upwards from under the paw to expose the long fur in between the digits. Photo 12 reveals the resulting stragglers from in between. When trimming all four feet you want to keep in mind a domed oval. I envision an egg. Lappy feet are oval not round, so keeping an egg in mind will give you an outline follow.


Shaping the Furnishings

Photo 13 gives an example of how to cut the lower FRONT leg furnishing (the long frilly hair on the back of the leg). I do this for two reasons. I like to lift the fur from dragging in the dirt which cuts back on my mopping and vacuuming; and it looks better, in my opinion, to have the fur taper from the back of the pad to the longer fur. It is NOT a dramatic cut - note the slight angle!!!! When in doubt don’t cut. Too drastic a trim can really cut back on the dirt, but leave you with a goofy looking leg.
Using a Dremel

Photo 14 shows proper dremel technique. Notice that one thumb is holding the digit away so I can get a proper angle to trim, while the other thumb is applying pressure/support to the nail itself (at the base) to reduce vibration. I have found the dremel to be the easiest trimming method for dogs to grow accustomed to with the least amount of quicking accidents. DO NOT use the dremel on any one nail for more than 3 seconds at a time as the friction causes heat! Be sure to remove the dremel, check the nail for heat (if it’s warm, move on and come back to that nail!) If your dog’s nails are so long that it would require long periods of dremel application, I recommend using a clipper to remove some bulk nail material prior to dremeling.
The Final Result

Photos 15 and 16 show the results of our efforts. It’s not quite a show paw, as the camera revealed a few more fuzzies that need removal, but for the pet foot it will get the job done.
Now that we have two paws out of the way lets look at the rear two.
Photo 17 shows a messy back paw. Photo 18 shows how to use the rake, or any comb to brush the hock fur out strait. Do so prior to any cutting. This allows you to know what fur goes where, as the back feet and hocks get twisted and matted down some due to sitting and lying. As shown in Photo 19, find the back of the pads and trim flush. Then work your way forward to the rest of the paw. At this point treat it as a front paw, and repeat.


Now release your Lappy, straiten up, and enjoy the fruits of your labors.
I took the time to make these pictures as this is a topic often visited on the group site and OFTEN questioned by my puppy buyers. It’s always easier to demonstrate the process in person, and if you ever want help, just ask! Many of us will be happy to show you how to do this in person, but hopefully this will help you keep your own Lappy looking as handsome and tidy as they all deserve to be.